Let’s be real — when was the last time you opened up your gaming rig and gave it a proper clean? If you’re like most gamers, the answer is probably “a while ago” or maybe even “never.” And honestly, that’s more common than you’d think. But here’s the thing: a clean gaming PC isn’t just a matter of aesthetics. It’s one of the most impactful things you can do to protect your hardware investment, maintain peak frame rates, and squeeze every ounce of performance out of your setup. Think of your PC like a high-performance sports car — you wouldn’t skip oil changes and expect it to keep running like a dream, would you? PC maintenance is exactly the same idea, just with compressed air instead of engine oil.
This guide covers everything you need to know about computer cleaning and ongoing maintenance — from the tools you need, to a step-by-step cleaning process, to the software habits that keep your machine humming for years. Whether you’re a casual gamer or a hardcore enthusiast, this one’s for you.
Why Cleaning Your Gaming PC Actually Matters
Before we jump into the how, let’s talk about the why — because understanding the stakes makes you a lot more motivated to grab that can of compressed air. Your gaming PC generates a tremendous amount of heat during operation. The GPU alone can hit temperatures of 80°C or higher under load, and the CPU isn’t far behind. The cooling system in your case is designed to manage that heat through a constant exchange of air — cool air enters, hot air exits. When dust builds up inside your case, it acts like a thick blanket over your components, suffocating that airflow and trapping heat where it doesn’t belong.
The Hidden Cost of Dust Buildup
Dust is sneaky. It doesn’t announce itself with an error message or a sudden crash (at least not at first). It creeps in silently, settling on fan blades, heatsink fins, and filters until your system starts gasping for airflow. Dust buildup is one of the most common reasons gaming rigs experience high temperatures, lag spikes, sudden shutdowns, and reduced performance. When dust blocks airflow, internal components are forced to work harder, resulting in overheating and premature wear. Tech Times What that means in practical terms is that your GPU might start thermal throttling mid-session, dropping your frame rates right when you need them most. Your fans will spin louder and faster, adding noise and stress. And over months and years, that consistent overheating chips away at component lifespan, potentially turning a $500 GPU into a paperweight years before it should fail. The financial cost of ignoring dust is far greater than the five minutes it takes to clean it.
How Heat Kills Performance (and Hardware)
Here’s something that surprises a lot of gamers: modern CPUs and GPUs are designed to automatically reduce their clock speeds when temperatures get too high — a process called thermal throttling. It’s a safety mechanism, but it means your hardware is actively delivering less performance to protect itself from heat. A difference of 1–5 degrees Celsius from dust accumulation can contribute to a measurable amount of thermal throttling, and variables like airflow and dust on components all contribute to the FPS experienced in-game. Apex Gaming PCs That translates directly to worse gaming experiences. Beyond throttling, sustained high temperatures accelerate the degradation of capacitors, solder joints, and other delicate electronics inside your components. A well-maintained, cool-running PC simply lasts longer — it’s that straightforward.
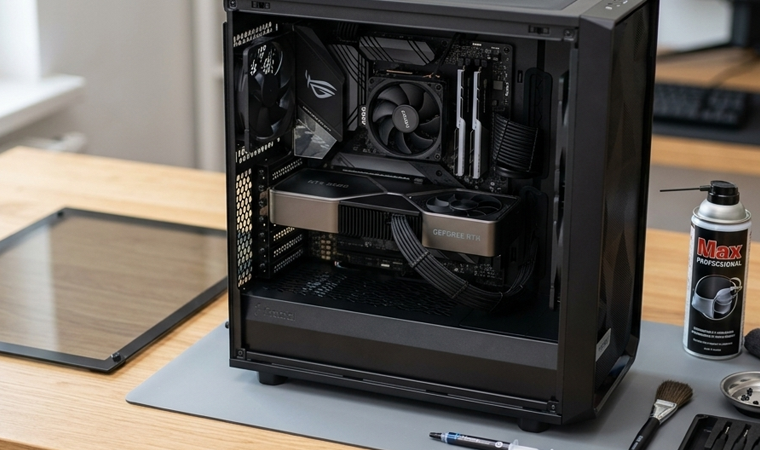
Tools You Need Before You Start
Getting ready to clean your gaming PC doesn’t require a professional toolkit or a trip to a specialty store. Most of what you need is inexpensive, widely available, and probably already in your home or easily ordered online. Having the right tools makes the process faster, safer, and more effective, so it’s worth spending a few minutes gathering everything before you start tearing into your case.
Essential Cleaning Supplies
The foundation of any good PC cleaning kit starts with a can of compressed air — this is your primary weapon against dust. It can blast debris out of tight spaces, through fan blades, and across heatsink fins without any risk of static discharge or physical damage. Alongside that, you’ll want isopropyl alcohol (90% concentration or higher), which is safe for electronics and evaporates quickly without leaving residue. A microfiber cloth is essential for wiping down surfaces, case panels, and monitor screens without scratching. A set of soft-bristled brushes (like old toothbrushes or dedicated PC cleaning brushes) help you work loose dust from corners and filters. An anti-static wrist strap is highly recommended — it grounds you to the case and prevents electrostatic discharge from damaging sensitive components. You’ll also want thermal paste on hand if you’re planning to clean and reseat your CPU or GPU cooler, since you’ll need to reapply it afterward.
What to Avoid Using
Knowing what NOT to use is just as important as knowing the right tools. Vacuums generate static electricity that can damage electronics, Tech Times so resist the temptation to reach for the household vacuum cleaner. Paper towels and regular tissues might seem convenient, but their rough surfaces can scratch delicate components and leave lint behind. Never spray liquid cleaning solutions directly onto components or into your case — always apply to a cloth first. And absolutely never use metal tools to pry or scrape dust off surfaces. Patience and the right tools are always better than brute force when it comes to PC maintenance.
How to Safely Prepare Your PC for Cleaning
Powering Down and Grounding Yourself
This step sounds obvious, but it’s where a lot of people get lazy — and where preventable damage happens. Before you touch anything inside your case, you need to completely power down your PC and unplug it from the wall. Not just put it to sleep, not just switch it off at the power button — fully unplugged from the power outlet. This eliminates any risk of electrical damage to you or your components. Always ground yourself or use an anti-static strap to avoid damaging sensitive components, Pcbuildmaster because even the static electricity built up in your body from walking across a carpet can fry a RAM stick or a GPU if you’re not careful. Once your PC is unplugged, press the power button once to discharge any residual electricity stored in the capacitors. Then move your rig to a clear, well-lit workspace — a wooden table is ideal since wood is non-conductive. Take your PC outside or to a garage if possible when using compressed air, as you’ll be blowing a lot of dust into the air and you don’t want it resettling inside your workspace.
Step-by-Step Guide to Cleaning Your Gaming PC
Now we’re getting to the good stuff. Follow these steps methodically and you’ll have a noticeably cooler, quieter, and better-performing rig by the time you’re done. Don’t rush the process — a careful computer cleaning session done right every few months is worth far more than a hasty one done wrong.
Cleaning the Case and Dust Filters
Start from the outside and work your way in. Remove the side panels of your case (most modern cases use thumbscrews or tool-less latches) and set them aside. Before anything else, locate your dust filters — most gaming cases have them on the front intake, top exhaust, and bottom (covering the PSU intake). These filters are your first line of defense and often the most clogged part of the whole system. Remove them and tap them gently over a trash can to knock loose the bulk of the dust, then use compressed air or rinse them under water if they’re particularly dirty (let them dry completely before reinstalling). Clean filters monthly, especially front intake and PSU filters, YEYIAN GAMING and you’ll dramatically slow the rate at which dust accumulates inside your case. Use compressed air to blow out the interior of the case itself, working from top to bottom so dust falls downward and out. A soft brush helps dislodge stubborn dust from corners and cable management channels.
Cleaning Fans and Heatsinks
Case fans are dust magnets — their constant spinning creates a vortex that attracts and holds particles on the blade edges and hub. Use compressed air to clean each fan, but here’s a critical tip: hold the fan blade still while blasting it with air. If you let the fan spin freely from the compressed air blast, you can overspeed the motor and damage the bearing. Hold the blades in place with your finger or a pencil while you work around each blade with short bursts of air. For heatsinks — whether that’s your CPU tower cooler, AIO radiator, or the heatsink fins on your GPU — use compressed air at an angle to blow dust through the fins rather than deeper into them. A soft brush can help work through particularly packed fin stacks. Getting heatsinks clean makes one of the most dramatic differences in temperatures because their entire job is to dissipate heat, and dust-clogged fins can’t do that effectively.
Cleaning the GPU
Your graphics card deserves special attention during a clean gaming PC session because it runs hotter and harder than almost any other component. Most GPUs have two or three fans on the bottom side of the card and a heatsink fin stack that runs the length of the card. Use compressed air to blow through the fins from both ends, and clean the fans the same way you did the case fans — hold the blades still. If your GPU fans have significant dust packed into them, you may want to carefully remove the GPU from its PCIe slot for better access. Disconnect all cables from the graphics card, remove the screws securing it, release the tab underneath, and carefully pull it out. CyberPowerPC With the card in hand, you can get much better angles with your compressed air and brush. Be gentle with the PCIe connector pins and never touch the golden contacts.
Cleaning the CPU Cooler and Applying New Thermal Paste
The CPU cooler sits directly above your processor and is responsible for pulling heat away from one of the most important components in your system. Whether you have an air cooler with a tower heatsink or a liquid cooler with a radiator, the approach is similar: clean the fans and fin stacks with compressed air and a brush. For AIO (all-in-one) liquid coolers, pay particular attention to the radiator fins — they collect dust aggressively and need to be blown out thoroughly from both sides.
When to Replace Thermal Paste
Here’s a maintenance task that many people overlook but can make a surprisingly large difference in CPU temperatures. Thermal paste plays a crucial role in heat transfer between your CPU or GPU and their heatsinks, and over time it can dry out, reducing efficiency and causing higher temperatures. AVADirect If you’ve cleaned your CPU cooler thoroughly and your CPU is still running hotter than expected, old thermal paste is likely the culprit. As a general rule, reapplying thermal paste every two to three years is good practice. To do this, carefully remove the CPU cooler, clean the old paste off both the CPU heat spreader and the cooler base using isopropyl alcohol and a lint-free cloth, and apply a small pea-sized dot of fresh thermal paste to the center of the CPU before reseating the cooler. It’s one of those maintenance tasks that feels slightly intimidating the first time but becomes second nature quickly.
Cleaning the Power Supply
The PSU is one area where you should exercise real caution. Do not open or clean the inside of your power supply. Instead, use a can of compressed air to blast dust through the rear vent. The internal cleaning of a power supply should only be done by professionals due to the risk of shock. iBUYPOWER® PSUs can retain a dangerous electrical charge even when unplugged, so opening one is not a DIY task. Stick to blasting compressed air through the exhaust vent on the back of the unit to dislodge dust, and make sure the PSU’s own dust filter (if your case has one underneath) is clean. This is usually sufficient to keep the PSU breathing properly.
Cleaning Your Gaming Peripherals
Keyboard, Mouse, and Monitor Care
Your peripherals take a beating during long gaming sessions — fingers, snacks, and general grime work their way into every crevice. Cleaning your peripherals is a key part of holistic PC maintenance and makes your entire setup feel fresh. For your keyboard, start by holding it upside down and gently tapping it to shake out crumbs and debris. Use a vacuum by running its tip over the keys, pressing them so you can reach all the crevices. CyberPowerPC Follow up with compressed air between the keycaps for any remaining particles. A cotton swab dipped in isopropyl alcohol works beautifully for cleaning around individual keys and removing built-up grime from keycap surfaces. For your mouse, wipe down the body and buttons with a cloth dampened with isopropyl alcohol, and use a toothpick to clear debris from the gaps between buttons. Keep compressed air handy for the optical sensor opening. When it comes to your monitor, always use a microfiber cloth — never paper towels or rough fabrics. If you need a cleaning solution, apply it to the cloth first, never directly to the screen.
How Often Should You Clean Your Gaming PC?
The honest answer is: it depends on your environment — but there’s a framework that works for almost everyone. A thorough cleaning should be done every few months, while quick maintenance tasks like dusting should be done every week. Prime Tech Support If you have pets in the home, especially cats or dogs, you should lean toward cleaning every two to three months — pet hair and dander are notorious for clogging PC filters at an alarming rate. If you keep your PC in a carpeted room, smoke indoors, or live in a dusty environment, the same accelerated schedule applies. For those with a clean, hard-floored space and no pets, a thorough deep clean every four to six months is probably sufficient. The table below gives you a quick reference for maintenance frequency:
| Task | Recommended Frequency |
|---|---|
| Dust filter cleaning | Every 2–4 weeks |
| Quick interior dust check | Monthly |
| Full deep clean | Every 3–6 months |
| Thermal paste replacement | Every 2–3 years |
| Driver and software updates | Monthly |
| Cable management check | Every 6 months |
One of the best habits you can build is to simply peek inside your case every month when you clean your dust filters. If you can see significant dust accumulation on fans or heatsinks, don’t wait — clean it now. Catching dust buildup early means shorter cleaning sessions and healthier temperatures year-round.
Software Maintenance: The Other Half of PC Health
Physical cleanliness matters enormously, but a truly well-maintained gaming PC also needs regular software attention. Think of software maintenance as the internal health of your machine — what’s happening under the hood at the operating system level. Neglecting software upkeep can lead to slowdowns, instability, and wasted storage space that undermines the performance gains you get from clean hardware.
Driver Updates and Storage Management
Keeping your GPU drivers up to date is one of the highest-impact software maintenance tasks you can do. AMD and NVIDIA regularly release driver updates that improve performance in specific titles, fix bugs, and improve stability. Outdated drivers can cause crashes, stuttering, and compatibility issues with newer games. Use your GPU manufacturer’s software (GeForce Experience for NVIDIA, Adrenalin for AMD) to stay on top of driver updates easily. Beyond drivers, storage management is crucial — a nearly full SSD can slow your system significantly. Routine software cleanup to remove temporary files and background processes, as well as automated storage management tools, helps reclaim disk space while maintaining system stability. Tech Times Tools like Windows’ built-in Disk Cleanup or third-party apps can help clear out temporary files, old game installs, and cached data. Temperature monitoring software like HWMonitor or MSI Afterburner lets you keep an eye on your CPU and GPU temps in real time, giving you an early warning if something is running hotter than it should after a clean.
Pro Tips for Keeping Your PC Cleaner, Longer
Once you’ve done your deep clean, there are several habits and environmental tweaks that will dramatically slow the rate at which dust accumulates inside your case. The single biggest one? Keep your PC off the floor. Placing a PC on the floor increases dust intake significantly, Tech Times because floors collect far more dust, pet hair, and debris than desk surfaces. Elevating your PC to desk height reduces dust intake meaningfully. If your desk doesn’t have room, at minimum use a small stand or platform to raise it a few inches. Good cable management inside your case also makes a big difference — messy cables block airflow and create dead zones where dust collects and stagnates. Using zip ties or Velcro straps to route cables neatly behind your motherboard tray improves airflow, makes cleaning easier, and honestly makes your build look a lot better too. Maintaining positive air pressure inside your case — having slightly more intake fans than exhaust fans — means air is always being pushed out through the gaps in your case rather than being sucked in, which reduces dust ingress significantly. Finally, consider the environment your PC lives in. A room with an air purifier will keep your rig cleaner, and closing your intake vents when you’re not gaming can prevent dust from settling on filters during idle time.
Conclusion
Maintaining a clean gaming PC isn’t complicated, and it doesn’t require expensive tools or professional expertise. What it does require is consistency and a willingness to spend thirty minutes every few months giving your rig the attention it deserves. The rewards are real and measurable: lower temperatures, quieter operation, smoother frame rates, and a system that lasts years longer than one that’s left to choke on its own dust. PC maintenance is one of the best returns on investment in all of gaming — a small time commitment that pays dividends in performance and longevity. Whether you’re rocking a budget build or a high-end beast, the principles are the same: keep it clean, keep it cool, and it’ll keep delivering.
FAQs
1. Can I use a regular household vacuum to clean my gaming PC? No — household vacuums generate static electricity that can damage sensitive electronic components. Stick to compressed air cans or purpose-built computer vacuums with anti-static features. The risk of a standard vacuum simply isn’t worth it.
2. How do I know if my PC’s temperatures are too high? Download a free monitoring tool like HWMonitor or MSI Afterburner. As a general guideline, CPU temps above 90°C under load and GPU temps above 85°C sustained are warning signs that your cooling needs attention — whether through cleaning, thermal paste replacement, or improving case airflow.
3. Is it safe to clean a gaming PC without an anti-static wrist strap? You can reduce risk by touching a grounded metal surface (like your unplugged PC case) before handling components, but an anti-static wrist strap is cheap and virtually eliminates the risk. For regular cleaning where you’re not removing components, the risk is low — but when handling RAM, GPUs, or CPUs, always ground yourself properly.
4. How do I know when it’s time to replace thermal paste? If your CPU temperatures are consistently higher than they used to be under the same workload — and cleaning the heatsink didn’t solve the problem — old thermal paste is the likely culprit. As a general rule, plan to replace thermal paste every two to three years as part of routine PC maintenance.
5. Does cleaning my gaming PC actually improve FPS? Yes, it can — indirectly but meaningfully. When components overheat, they thermal throttle, reducing clock speeds to protect themselves. A thorough cleaning that restores proper airflow can eliminate throttling and return components to their rated performance. A clean PC often drops 5–20°C after proper maintenance, Pcbuildmaster which can make a noticeable difference in sustained gaming performance.